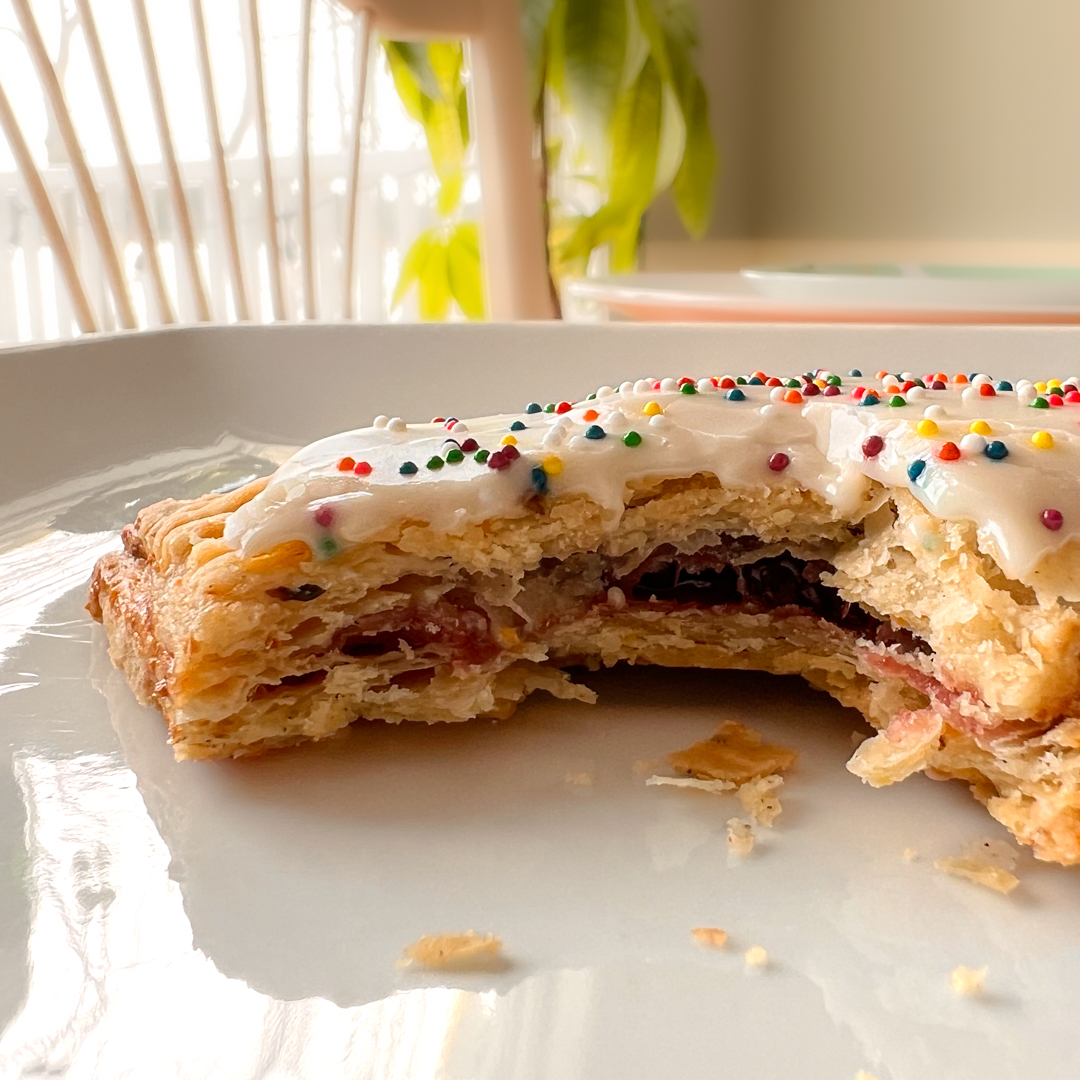
This homemade pop tarts recipe make a fun and tasty treat perfect for breakfast, snack time, or even dessert. This unique version is made with pistachio-cardamom dough, a cherry-strawberry filling, and vanilla icing. Short on time? Use a store-bought jam with a thick consistency instead.
Don’t be intimidated by making your own dough. This post is loaded with recipe tips, ingredient notes, and troubleshooting to help you along the way. Check out my Perfect Pie Crust recipe for a whole post dedicated to it as well!
Why Make a Homemade Pop Tarts Recipe?
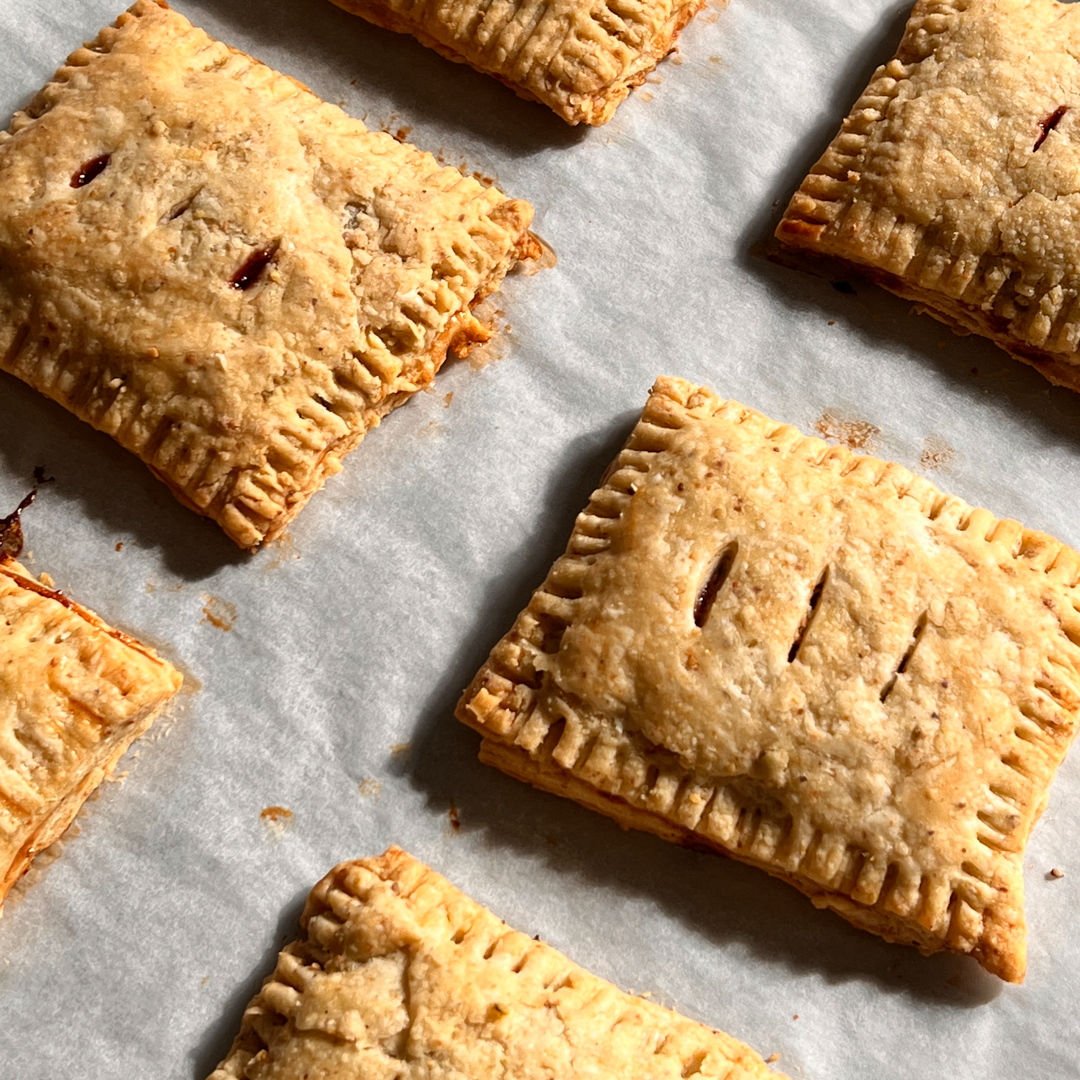
Get ready to go on a pastry adventure! Homemade pop tarts, aka toaster pastries, are like store-bought but with only natural ingredients and made entirely from scratch. The dough is generally a mix of flour, butter, sugar, salt, and water rolled out into thin, rectangular pieces. The filling can be customized with jam like strawberry or raspberry or a sweetened brown sugar and cinnamon mixture. It is spread over one piece of dough, leaving just enough space around the edges to seal all that goodness. The top layer of dough is carefully placed on top and crimped around the edges, creating a perfect little pocket of deliciousness. Finally, the pop tarts go into the oven and emerge golden brown and crispy, ready to be enjoyed warm or at room temperature. And don’t forget the finishing touch – a simple icing on top!
I’m Obsessed With These Pastries
I ate too many toaster pastries when I was young; I developed a taste aversion to them. In the past two years, the flame rekindled, resulting in my emptying the work vending machine on an occasional basis or being gifted one on my desk from time to time (thanks, Stacey!).
Ingredient Notes – Dough
- All-Purpose Flour: Make sure to use all-purpose flour, as other types of flour may not yield the same results.
- Pistachios: Use shelled and salted pistachios for the best flavor, and grind them with a blender or food processor until finely ground.
- Cardamom: Find ground cardamom in most grocery stores in the spice aisle. It adds a unique flavor to the dough that complements the cherry-strawberry filling. Skip it if this is not your flavor.
- Butter: It’s essential to use cold unsalted butter and cut it into small pieces. The cold butter will help create a flaky texture. Salted butter has a higher water content which can add to the gluten formation with the flour, resulting in a tougher pastry.
- Shortening: A small amount of shortening added to the dough helps its pliability. This makes the dough less subject to tearing and allows for easier rolling. It also allows the flavor of the butter to shine.
Cherry-Strawberry Filling
You’ve never seen a homemade pop tarts recipe like this! Frozen and fresh cherries and strawberries are an ideal match, pairing perfectly with the pistachio flavor. The lime juice adds flavor, while the cornstarch helps thicken the jam, preventing the filling from leaking when the pastries are baked.
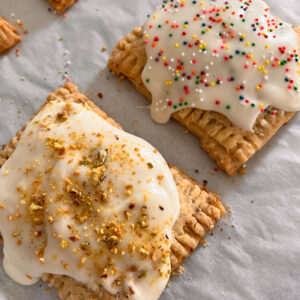
Vanilla Icing
Powdered sugar, heavy cream (half and half or milk would also work), and vanilla extract are all needed to make this icing. Corn syrup is optional. It helps harden the icing and enhances its consistency.
Recipe Notes
- Chill the dough. After making the dough, chill it in the refrigerator for at least 1 hour before rolling it out. This will help the dough firm up and prevent it from sticking to the rolling pin. If the dough sticks to the rolling pin and a little bit of flour isn’t helping, chill the dough for 10 minutes before continuing.
- Roll 0ut the dough evenly. When rolling out the dough, make sure it’s even in thickness, about 1/8 inch. This will help ensure that the pop tarts cook evenly.
- Crimp the edges. Use a fork to press the edges of the toaster pastries together firmly. This will prevent the filling from leaking out during baking.
- Cut the dough into even sizes. Use a pastry cutter or sharp knife to cut the dough into even-sized rectangles, about 2.5″x4″. This will ensure that the pop tarts cook evenly and that the tops and bottoms fit together when assembling.
- Let the homemade pop tarts cool. After baking the pastries, let them cool for 15 minutes before adding the vanilla icing. This will prevent the icing from melting and dripping off.
Troubleshooting
Here are some common issues that may arise when making this homemade pop tarts recipe and how to troubleshoot them. Check out my FAQ page for additional troubleshooting tips, including notes on measuring ingredients and calibrating your oven.
The dough is too sticky.
Try sprinkling some flour on the surface and the rolling pin to prevent sticking. You can also chill the dough for a bit longer in the refrigerator to firm it up.
The filling is too runny.
Try cooking it a bit longer to thicken it up. You can also add a bit more cornstarch to help thicken it. Alternatively, drain any excess liquid from the fruit before adding it to the filling, especially if you cut the strawberries or use frozen fruit.
The pop tarts are burning.
Lower the oven temperature or reduce the baking time. You can also try covering the pastries with foil halfway through baking to prevent them from burning. Keep an eye on them while baking to ensure they don’t burn.
The pop tarts are falling apart.
The dough may be too thin or not properly sealed. Roll the dough out to an even 1/8″ thickness and use a fork to firmly crimp the edges to prevent the filling from leaking. You can also try chilling the pastries for a bit longer in the refrigerator before baking to help them hold their shape.
The icing is too thin.
You can add more powdered sugar to thicken it up. You can also try using less milk in the recipe to make a thicker icing. Let the toaster pastries cool before adding the icing to prevent melt-off.
The icing is too thick.
Try adding more milk or corn syrup to thin it out.
Storing Homemade Pop Tarts
Place pop tarts in an airtight container and store them for 2-3 days at room temperature or 4-5 days in the refrigerator. You can also freeze pop tarts by wrapping them individually in plastic wrap and placing them in a ziplock bag or airtight container. Freeze for up to 3 months. To eat, let them thaw at room temperature for about 30 minutes and then warm them in the toaster oven or microwave.
Let the pastries cool to room temperature before storing them to avoid condensation inside the storage container.
Strawberry-Cherry & Pistachio Pop Tarts
Equipment
- Mixing Bowls
- Measuring Cups and Spoons
- Pastry Cutter (or two forks)
- Whisk
- Rolling Pin
- Half-sheet Baking Pans
- Saucepan if making filling
- Digital Scale optional
- Food Processor optional
- Bench Scraper optional
- Rolling Mat optional
Ingredients
Crust
- ¼ Cup Salted Pistachios shelled - 30g
- 2 ½ Cups + 2 Tbsp All-purpose Flour 315g
- 1 ½ Tbsp Powdered Sugar 12g
- 1 ¼ Tsp Kosher Salt 7.5g
- ½ Tsp Ground Cardamom 1g
- ¼ Cup Shortening 51g
- ¾ Cup Unsalted Butter very cold, cut into cubes - 170g
- 8-10 Tbsp Ice Water 120g-150g
Filling (or can use store-bought jam)
- 1 Cup Frozen or Fresh Strawberries whole or sliced - 144g
- 1 Cup Frozen or Fresh Cherries pitted - 138g
- ½ Cup Granulated Sugar 100g
- 1 Tsp Lime Juice 5g
- 1 Tbsp Water 15g
- 1 Tsp Cornstarch 2.5g
Assembly
- 1 Tbsp Jam Filling store-bought or homemade
- 1 Large Egg
- ½ Tsp Milk
Icing
- 1 Cup Powdered Sugar 120g
- 4-6 Tbsp Heavy Cream or half and half - 60-90mL
- ½ Tsp Pure Vanilla Extract 2g
- 1 Tsp Corn Syrup 6g
- 2 Tbsp Rainbow Sprinkles and/or Crushed Pistachios optional
Instructions
Preparing the Crust
- Pulse pistachios in a food processor 4-6 times until fine crumbs are formed. Pour into a large bowl along with flour, powdered sugar, kosher salt, and cardamom. Whisk to combine.
- Using a pastry blender or two forks, cut the shortening into the flour mixture until evenly broken down into pea-sized pieces.
- Add the butter, and cut it into the flour mixture until evenly broken down into pea-sized pieces. No large clumps should remain.
- Add 4 Tbsp of ice water to the flour mixture, and press the head of a rubber spatula into the water spots to blend it into the dry ingredients. Blend for 15-20 seconds, and add 4 Tbsp of ice water. Repeat the process, using the head of the rubber spatula to press wet and dry areas together. The dough should begin forming. Add another 2 Tbsp of ice water and repeat the process. Pinch a portion of the mixture between your fingers--it should stay together, and it is okay if it is slightly crumbly. If the dough seems powdery, add 2 more Tbsp of water and repeat the process with the rubber spatula.
- Pour the dough onto a large piece of plastic wrap. Use the edges of the wrap to shape the dough into a disc, keeping the plastic as a barrier between your hands and the dough. Open the plastic wrap, and cut the dough in half. Place one half on another piece of plastic wrap, and use the wrap to shape the dough into a disc. It may be a little crumbly, but that is okay! It will continue hydrating in the fridge. Wrap both doughs and refrigerate them for 1 hour. At this point, you can make the filling.
Filling (if not using store-bought jam)
- Place strawberries, cherries, sugar, and lime juice in a medium saucepan on a stove burner over medium heat. Cook, occasionally stirring, until the mixture bubbles, about 5 minutes. Reduce the heat to low, and continue simmering for 20 minutes until most of the liquid evaporates and clean lines begin to show when you drag a spoon across the mixture.
- While the mixture simmers, stir the cornstarch and water in a small bowl until well blended, creating a slurry. When clean lines show in the jam mixture when a spoon is dragged across it, pour the slurry and continue cooking for 1 additional minute. Pour the jam into a clean bowl to cool completely before using.
Assembly
- Preheat the oven to 375°F / 190°C and place a rack in the center. Line two baking sheets with parchment paper.
- Lightly flour a work surface, place one of the dough discs on it, and lightly flour the surface of the dough. Lightly flour a rolling pin.
- Roll the dough into a rectangular shape until it is ⅛" thin. As you roll the dough, start from the center and work your way out, being sure to stop short of the edge of the dough. Pick up the pin, and return to the center, repeating the same process until a rectangular shape is achieved. Sprinkle more flour underneath to prevent the dough from sticking to the surface. Once the dough is rolled, cut off any jagged edges with a bench scraper or knife so that a clean rectangle is formed, about 8"x10" after all cuts are made.
- Cut the first dough into (8) 2.5"x4" rectangles: Cut the dough in half lengthwise, and cut the dough across widthwise three times. Place each rectangle on a baking sheet lined with parchment and place in the refrigerator to chill.Cut the second dough into (8) 2.5"x4" rectangles. Repeating the above process.Combine remaining scraps, and repeat the process to cut out 4 additional 2.5"x4" rectangles. Place these slices on the last tray to go in the fridge.
- Whisk the egg and milk in a small bowl until combined.
- Starting with the first tray to go in the fridge, spread 1 Tbsp of jam on 4 of the 8 dough rectangles, leaving a ½" border. Using a pastry brush, brush the egg wash along the ½" border of the other 4 rectangles. Place each over the filling-covered rectangles, and press firmly around the edges while being careful not to squeeze the filling out. Using the tines of a fork, seal each pastry on all sides. Slice three small vent holes on the top of each. Place the tray back in the refrigerator.
- Repeat the process with the remaining 12 dough rectangles: 6 will have 1 Tbsp of filling, whereas 6 rectangles will have a ½" egg wash border and be used to top and seal the pastries.
- Combine all pastries onto one baking sheet, leaving about 1" of space between each. Refrigerate for 5 minutes, and bake until golden brown around the edges, about 25-30 minutes. Set aside to cool on a cooling rack.
Icing
- Combine powdered sugar and 4 Tbsp of heavy cream in a small bowl. Whisk to combine. Add corn syrup and vanilla, and whisk to combine. Add more heavy cream to reach your desired consistency, if needed, up to 2 Tbsp additional.